How to Add Closed Captions in Your Video Talk
Tutorial for creating closed captions automatically
YouTube Studio can be used to generate closed captions for your talk by following these simple steps:
-
First, record the video of the talk. The video should have a clear voice recording.
-
Sign in to YouTube Studio.
-
Click on
CREATE > Upload videos. Then upload the recorded talk and fill the standard options (title, description, etc.). Finish the upload and publish it. It will take some time to upload and process the video.
Video language (e.g., English), and Caption certification (e.g., This content has never aired on television in the U.S.).
- After the video is published, select
Videosfrom the left menu and click on the video. It will open the video editing options.

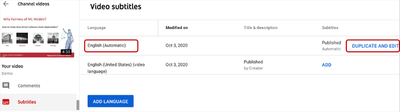
- Click
Subtitlesfrom the left menu. You should seeEnglish(Automatic)subtitle option there. ClickDUPLICATE AND EDIT.
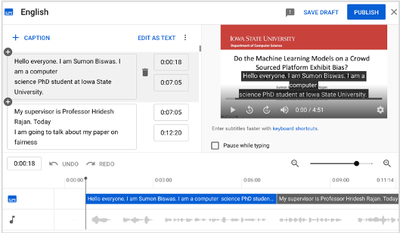
- You should see the automatically generated text from the speech. You have two options to finalize the captions:
- You can edit the text to make corrections: adding punctuations, capitalization, misspelled words, etc. The text will be automatically synced with the timing. However, you can modify the timings too. Note that, in one timeframe, you should not put a lot of characters which will cover much space on the screen.
- Alternatively, you can delete the automatically generated text and add your text manually by clicking on
+CAPTION. Then write the text, start time, and end time.
-
Save the draft and click
PUBLISH. -
Finally, click on
Optionsbeside theEDITbutton and clickDownload. Then select.srtformat. Thus, you get your closed caption for your talk in a.srtfile.
.srt file is editable with a text editor as well. Be careful with the formatting and finally check whether the captions are working on a video player on your computer.
Here is an example talk with closed captions. Click on the CC button on the video if the closed captions are not enabled on YouTube. You can get other details about YouTube Studio captioning here.
Other Options
Apart from YouTube Studio, there are other tools too for generating captions (.srt).
-
Maestra is an online service to generate and export subtitles. You can sign in, upload your video talk, transcribe, edit the auto-generated subtitles, and then export
.srt. -
Otter.ai can be used to do the task. You can find the instructions here. Although its a paid service, there could be some free trials.
-
Rev is another paid service to generate captions manually by human experts.
Other tools can be also used. Depending on the backend transcribe engine, the correctness can vary. However, you should edit the auto-generated text to finalize the closed captions.